

Introduction
For centuries, the Nabooti tribe has been protected by the power of seven sacred jewels. But now, the jewels are missing! Trek across Africa to find the missing jewels and return them to the Nabooti tribe. You’ll visit pyramids, ancient mines, and giant waterfalls on your online virtual world quest.
Video Guide
Island Guide
Walkthrough and images by Lucky Joker.
As soon as you land on Nabooti Island, head over to the Nabooti African Museum. Make your way down to the bottom of the room and talk to the woman standing next to the totem. Pick the last speech bubble and say you’re in! Now, exit the museum and run to the left. Hop into the plane and take flight. Fly in a South-Eastern direction to get to Mountains of the Moon.


Red Jewel:
Upon first arrival, you might see some goats running around. Try to avoid them as
possible, and run to your right. For the exception of this goat, use him to get you up to the second level, like this:

Then run to your right a little, and jump on the next surface. Run left and get the “Opuntia Fruit” (the magenta cactus). Afterward, run to your right, jump over the waterfall, and continuing run to the right. Jump up to the next level, and watch out for goats and falling rocks. Make your way left by jumping onto each surface . Jump to the next few platforms of ice and make your way right. Be careful! It’s slippery! Once you’ve slid to the right, make your way up and talk to the man who appears to be homeless. What we want to do is get into the cave, for there is a jewel that awaits us. In order, to do so. We must be able to beat the man at a fine game of mancala!

If you don’t know how to play, the old man will explain the rules to you. If that does not
help, hopefully this video play through can give you an ides of how to achieve success! If that doesn’t help, then I have nothing for you. Sorry
Once you enter the cave, fall all the way down to the bottom left corner. Pick up the Cell Phone. Now, jump back up and over to the right. Try not to slip or you’ll have to start over. Make tour way all the way to the right and grab the Red Jewel!

You can now exit the cave. Fall all the way down the cliff. Before you worry, no, your Poptropican will not die. Jump into your plane and fly right up to Blue Nile Falls. (North-Eastern)
Purple Jewel:
One you land, jump up on top of your plane and onto the grassy platform above. Keep making your way up and obtain the Egyptian Blue Lily. We will need this later for trading purposes. Once you’ve gotten the lily head over to the right, keeping up at the top. Talk to the woman standing on the surface. She’ll need your help getting the chicken, fox and feed across the canyon, using the carry-on. To accomplish this task, you’ll have to solve a very strategic puzzle, Never fear Jokers! I will show you exactly how to do it! For the first part, take the chicken to the left. It wasn’t shown for some reason.
As a reward for aiding her, she will let us in on a little secret. Make your way all the way to the right. Jump down a few platforms, and you’ll see what resembles a very large Aloe bush. Click on it to discover an entrance to a cave. Go on inside, and make your way to the right, by jumping on the narrow platforms. Watch out for the falling stalactites along the way. It might seem difficult at first, but it gets easier the more you try.

Once you’ve gotten the gem, go ahead and exit the cave and hop on your plane and travel to Kaya Forests. (South)
Golden Nugget:
Before we can get another jewel, we’ll need to collect a few more items first. Fly over to Kaya Forests. Once you land. Walk a little to your right. Jump on the hut, and then jump on the tree. You’ll discover a golden nugget. Go ahead and pick up that baby! Now head over to Nabooti and get trading!

Trading Session 1:
When arrived, run to the trading post. Talk to the lady in orange, and trade her the Blue Lily for a turban. Talk to the man, and trade him the golden nugget for a camera. Seems like we made some pretty bad bargains, but it’s worth the Island Medallion! Anyway, hop into your plane, and fly to the Safari. (East)

Safari:
Run to the right, past the Internet Café, and talk to Zeke. Offer help, and you’ll be led to a “mini-game”– I guess you could say. He needs you to take 7 “good” pictures of 7 different wild animals.
How to play:
1. Move your cursor around to move your camera
2. Wait for the animal to come completely out of it’s hiding spot, and to stand still
3. Click the screen to snap the shot
Here’s where they all are: (Another video)
In return for our amazing deed, he will give us a hard hat, which will come handy in this next part. Head over to your plane, once again, and fly to Diamond Mines. (South)
White Jewel:
As soon as you land, put on your hard hat. Next, run to the right,over the dune. Run down the other side and continue right, until you see a switch.
Read this before you play!
Click on the switch. A timer will set off. Quickly run to the left, and up the dune. At the peak of the dune, jump to the metal platform, and run up. Let yourself fall down/right through the gap. Once landed, run to the right and jump on the barrel. Enter to the next screen through the worn barbed wire fence.
Run to the left, and make your way up the platforms. Dodge the carts as best as possible. Make your way up, by snaking your way up the platforms– going left, right, left, right. Once you made it to the top, enter the drop down. Once you’re in the cavern, turn off the green switch, so that sparks aren’t flying everywhere. Go to the left and push the barrel of oil, in the right direction.The barrel will leak (which is what we want). Push it until you hit
 the rock. Go back and turn the switch back on. Sparks will fly, and ignite because of the oil leakage. The rock will explode, allowing you to walk further– but, we’re not done yet! Repeat this process once again. When the wall of rocks explodes, POP into the next screen. Walk and push the cart. Once you push it far enough, you’ll
 automatically hop in and start a mini-game. The object is to finish gliding on the cart, and to make it to the other side of the cavern, to find the white jewel. You will need to duck, when you come close to the top, and to jump when you come to the bottom– to dodge the stalagmites. *TIP: Jump a little before you get to the stalagmite, to dodge it successfully.* You will have to duck and jump three times each. Also, the stalagmites get bigger and bigger as you progress. If you fail, you’ll always be given the option to try again. Like most Poptropica mini-games, it may seem hard at first, but, eventually, you’ll get the hang of it. Once finishing the game, you’ll be led to the next screen. Run all the way to the right. Hop on the rock, then hop on the wooden platforms. Click on the white jewels, to further examine them. Just grab the magnifying glass, and hover it to the right to find the right jewel. The White jewel we want should have an inscription on it.

After all of that adventure, climb up the rope. We’ll automatically come out of a whole right in front of our plane! How convenient right? Our next destination is Giza, so head over there.(North)
Blue Jewel:
When you arrive, put on your turban to “blend in” with the rest of the diggers. Talk to the
 guy holding the shovel. He’ll give you the shovel with a number written on it. Use your cell phone and dial it in. *555-6789* Vincent’s phone will ring, and he will be distracted.Click on the tote bag, and you will find a moonstone. Run left, and jump up to the top of the pyramid. Use the moonstone to open the door to the tomb. Run to the right of the tomb, and stop when you see four panels. Click to solve the puzzle. I’m not sure if this is different for every Poptropican, but my advice is to just dabble with it, and you’ll eventually solve it. What you want to do is to get all four panels facing horizontally, so that the floors ahead will all be facing horizontally. If you don’t, you’ll be politely greeted by a vicious scorpion, and you won’t be able to get ahead. After solving the puzzle, run right across the floors you’ve just manipulated, and go to the next screen.
Jump up, and walk to the left, to figure out we have to do another puzzle! Yay! What we have to do is to get this ▼ Into this ▼


Here’s one way to do it! Just follow these steps:
1: Push the far right box down and all the way left, past the “reset” button.
2: Push the far left box down, and set it next to the one we already pushed to the left.
3: Push the middle left box down to the left, and push it far, to the right of the room.
4: Push the remaining box down to the right
5: Then, push the outer boxes, in, to connect them all!
6: Make sure to align them with the engraved version on the wall.
Read this before you play!
To get to the top of this tomb, we’ll have to jump up on one tile of each level. Each tile on each level has a design imprinted on it. Jump on the tiles in this order:

Once, you make it to the top, enter the next screen. Follow the path until you see the room with the tomb in it. There are four pillars in the room– each with a lever. In order to open the tomb, you’ll need to flip each lever in a certain order. Follow this one here:

The first one you want to pull is the lever on the far right. Next, the second one from the left. Then, the second one from the right. And finally, the one on the far left. Yay! Now we have the blue jewel! Afterwards, jump to the top left corner of the room, and drop down to exit. Drop down from each of the levels and walk left to completely exit the Sphinx. Enter your blimp and fly South East to Kaya Forests.
Ebony Elephant: 
When you arrive at Kaya Forests, walk over to the second hut, and use your Opuntia Fruit. A tortoise will come to feat, while uncovering a whole. Use your shovel to dig your way down. You will find an Ebony Elephant, which will come to use through trade– but you will also awake two spirits who need your help. They would appreciate if you returned their Fingo so that they could rest in peace– which is exactly what we’re going to do for them! Head back to Nabooti to trade! (Northwest)
Trading Session 2:
Walk to the trading post, and talk to the woman wearing purple and blue. Trade in the Ebony Elephant for the the “Fingo”. Return to your plane and go to Kaya Forests one last time. (South East)

Green Jewel:
Run over to the spirits, and give them their Fingo. In return, they will give you the green jewel! That wasn’t too hard right? Well, now that we have the green jewel, we have collected all of the jewels we need to complete the island! Woohoo! Almost there. To complete Nabooti Island, return to Nabooti by flying Northwest from Kaya Forests.
Returning the missing jewels:
Once at Nabooti, head back to the Museum, and talk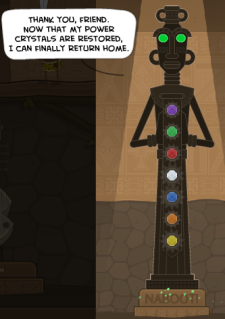 to the lady on the bottom floor. You’ll have to place the jewels in a certain order on the totem to complete your mission. She will give you clues to help you out, but you can just forget about those. Lucky Joker is here to do it for you! Just place them in this order shown here! ►
Once, you finish placing the jewels in their correct spots, the totem will come alive, and return to it’s home. Guess what? It flies into outer space! Who knew the jewels were of alien origin! Pretty cool! With the jewels all returned and the totem back home, you are finished with Nabooti Island! Yay!

![]() For more guides, check out our Island Guides page!
For more guides, check out our Island Guides page!![]()
